Showing posts with label SVG. Show all posts

Sunday, January 17, 2010

Mountain painting using Inkscape

mountain painting

Some of the quirks in this work in progress are outlined in the composite of four images below. Each of the four images is on a separate, Inkscape 0.47 layer, and they are listed in the following order: the lowest layer is first in the series and the highest layer is last.

The rocks are only partially drawn in the composite on purpose so that you may see that I drew the shadows first, and then in a new, higher layer, I drew the rocks on top of some of the shadows. I have also drawn one set of rocks on the mountain's main vertical ridge in the composite but I have not applied the filter to it so that this stage of drawing is illustrated. Click on the composite of the four images to see more details, including a few instructions related to some of the brushes and filters used in the painting.

The original photo from which I drew inspiration for this painting may be found at:
http://www.flickr.com/photos/christianabe/2267147039/in/set-72157601230921726/ and its parent site and license at:

Sunday, November 29, 2009

Portrait study using various filter-effects

Filter-effects may be applied to one of several layers in an image to achieve widely different results.


Overlay > Garden of Delights

Overlay Garden of Delights


Non Realistic Shaders > ComicNon Realistic Shaders Comic


Image Effects > Oil PaintingImage Effects Oil Painting

Saturday, November 28, 2009

Watercolor painting of a Pyrex bowl and saucer

pyrex bowl and saucer
There are approximately sixteen gradient shapes in this painting of a Pyrex bowl and saucer. I started with a simple drawing comprised of a couple of partially sketched lines as an outline. Then, beginning with the lowest layer and working forward, I drew various shaped-gradients and applied the vertical motion blur filter effect to each of the shapes. This left translucent and transparent areas in the shapes, through which the lower layer peeked.

The light on the rims and the sides of the bowl and saucer, for example, are merely not shaded at all. The clean edges of the gradient shapes at the top of each gradient shape provide the contrast necessary for the eye to "see" the edges of the bowl and and of the saucer although these are not actually drawn -- merely sketched, and not sketched completely.

The vertical motion blur filter effect simulates a wash, as if the brush stroke began clean at the top and ran out of material near the bottom of the effect. The vertical motion blur filter works really well in Inkscape paintings that are meant to simulate water color shades and materials.

SVG source in XML format is available on Google docs.

Inkscape filter effect for Web bullets and badges

My favorite Inkscape 0.47 filter effect for Web buttons, bullets and badges is "stained glass."
stained-glass icons


Below are some other examples of filter effects applied to the same shapes, for comparison.


neon-translucent

The background gradient is a gradient blend. The technique for achieving this effect is described elsewhere in this blog. It is not built into Inkscape like the filters used to create these examples.

Sunday, October 18, 2009

A wave using spiro splines and jam spread in Inkscape 0.47

wave

This wave was sketched very roughly using the brush tool in Inkscape 0.47 and then I outlined areas using Spiro splines and applied the jam spread filter effect to these shapes.

Monday, October 12, 2009

Study of hills and water inlet

inlet version two

The new version above is improved over the original below. This might be close to finished.


="inlet

The foreground and background still needs work in this study based on a photographic of Akaroa harbour by mollivan_jon on flickr. I have used Inkscape filters new to version 0.47 to paint the light and reflections to my satisfaction.

Akaroa on Wikipedia

If you refer to the original, you will see that I took gross liberties as far as composition of the paitning is concerned, but my intention was to focus on the shapes and the light and shadows on the hills as well as experiment with reflections on the water.

Saturday, October 3, 2009

Light on a Pine Forest Floor

pine forest floor
Experimenting with light . . . the original source for this painting is a photograph by bcostin available on flickr.

I used various Inkscape 0.47 filters on this adaptation of bcostin's great photo. I did sepearate scans of the photo for brightness cutoff, for colors, and for greys, and then deleted all but the basic colors, and then arranged the remaining scans to focus the eye on the light streaming into the trees and onto the forest floor, and, finally, applied several filters to a cropped image in order to blend the contrasts appropriately.

Tuesday, July 14, 2009

Mountain Gorge

The water is still cold in the streams fed with snow-melt, like the one pictured below. The snow is just now diminishing above tree-line in the part of the West where this photo was taken.


Inkscape was used to highlight aspects of tracings of the photo.

mountain gorge

The detailed shot above flows through the gorge pictured in the digital painting below (modeled on one of my photos).


gorge painting

The following inset shows the relative scale of the detail -- this mountain gorge is huge.


gorge-inset

Sunday, June 28, 2009

Pouring a gradient from a can

I enjoy Inkscape's ability to blend colors. It's almost like having gradients in a paint can.

pouring gradients from a paint can

Saturday, June 27, 2009

Arrow made of Bent Metal

This shape was constructed using the perspective effect in Inksacpe 0.46 as well as the following tip posted previously on jbrgfx:


Arrow made of Bent Metal

Monday, June 15, 2009

Animated Spiro

Animation Trick

changing star shape

Each frame of the animation is achieved by changing the base radius and / or the tip radius of the star shape and exporting the image as a PNG. Then the frames are converted into an animated GIF using Imagemagick.

Moving Clouds

moving clouds

Animation of filter-effect


This filter-effect is comprised of the following, in order:

  1. turbulence-fractal noise, applied to the source alpha
  2. color matrix, applied to the source alpha
  3. composite, applied to the source graphic

Saturday, June 13, 2009

Animated Radar Scanner using Inkscape and Imagemagick

I tried several new (to me) Inkscape features and effects in this animation of a radar screen:

  1. render grid
  2. neon object
  3. Animate GIsF

animated radar scanner


The Animate GIF Effect Plugin did not work well at all on my old notebook running Linux. I do not know whether others have had success with this Python add-in to Inkscape. It worked really hard on my project -- to fill up my /tmp DIR with images from which it would build the animation. But, my image layers were much too complex for this tool and I never let it finish. It came close to rendering an animated GIF, but after ten minutes, I killed the process and ran Imagemagick: it worked, as always, and gave me the desired product in . . . (I can't count the low) . . . microseconds..
Here is my convert command:
convert -delay 15 -loop 8 ./*.png animated-radar-scanner.gif


And, here is a sprite of the images that I exported from Inkscape and fed to Imagemagick using the convert command.


sprite of each frame

Sunday, June 7, 2009

Filter Effects as Patterns in Inkscape

The purpose of the demonstration:

Applying linear and radial gradients to irregular shapes in Inkscape often fails to achieve the desired effect. Drawing curved surfaces, for example, using gradients on two-dimensional objects in Inkscape can be difficult and time-consuming.


end product

So can drawing objects in perspctive when those objects have gradient borders. I commented on this issue in an earlier post. I used The Gimp to overcome this apparent limitation to Inkscape gradients and to achieve the effect that I desired. See how to make venetian blinds, drawing with Inkscape and the Gimp using gradient borders in perspective. The purpose of this experiment with Filter and Path Effects is to achieve a curved surface on a two-dimensional shape without using gradients. I have revised the approach to the problem, and have decided to try to design a solution using Inkscape's Filter Effects and apply the product to my shape as a pattern.

Tools used to create a curved shape out of a two-dimensional bezier path using filter effects and patterns:

  • Inkscape 0.46

The intended audience and required skills:


Advanced Inkscape users who are familiar with filter and path effects, converting objects to patterns, and applying patterns as fills to objects in Inkscape 0.46.


How to create a curved shape out of a two-dimensional bezier path using filter effects and patterns in Inkscape 0.46


Step One

Start by drawing a rectangular shape. Select it and open the Filter Effects Dialog box (Object > Filter Effects).


Step Two

Build a Filter Effect that contains the default color-matrix and turbulence, both applied to the Secure Graphic, with settings like those pictured below.


filter effect settings

Once you are satisfied with your texture, convert the texture to a pattern by selecting the rectangle and clicking Alt+i (or Object > Pattern > Objects to Pattern). My pattern is pictured below.


the pattern

Step Three

Now, draw a shape using the Bezier tool.
You may wish to apply a path effect to the shape in order to achieve the desired effect. I bent the path using path effects (shift+control+7).The pattern and the shape are shown in step five, below.


Step Four

Then, apply the pattern to the bezier path as a pattern fill using the Fill and Stroke Dialog box (Shift+Ctrl+F). The pattern and the shape are shown in step five, below.


Step Five

Finally, as pictured below, use the move, rotate and scale handles to manipulate the pattern and achieve the effect that you desire inside of your Bezier path.


apply the pattern to the shape

I wanted a shiny-steel, 3d appearance, so I zoomed in a great deal and moved all but the a few white highlights around until I was pleased with the result.


Helpful Resources

The briefinsights blog has some very useful examples of textures that can be made using color matrix together with turbulence in the Filter Effects dialog in Inkscape.

And, there is always the tutorial by the developer of Filter Effects.

Saturday, June 6, 2009

Add some depth to a flat drawing using Inkscape

The purpose of the demonstration:

Add some depth to the foreground of a flat drawing in a few steps.


Many clip art images that you may wish to use as samples are drawn well but may not be finished as far as you are concerned. Vector graphics are two dimensional by default, so this is an experiment in seeing where an image could benefit from additional work. In a later post, I describe one technique for creating a rounded surface in a flat object.original model

I got the inspiration for using the technique described in this post from an advertisement on television in which all objects of a animated cartoon where different shades of the same color -- the characters, the vehicle, the landscape, and the background. The shades and shapes on the television screen did not change, but their position relative to one-another changed to achieve a very effective animation. I was struck by how easy it would be to colorize shapes using the technique. And, as soon as I tried it in Inkscape, I realized that it was a good trick to use as one tries to apply different colorization schemes to a flat image.


This effect does nothing more than to stripe each separate object in an vector graphic with a gradient. The effect affects the image by simulating rounded edges to shapes. One may use this as an intermediate step in deciding how to colorize a drawing -- that is, in deciding whether objects need to be raised or lowered in relation to other objects and whether gradients of different opacity and different depths of colors will achieve the effect that the author intends.


Tools used to create depth on a flat image:

  • Inkscape 0.46

The intended audience and required skills:


Beginning Inkscape users who wish to learn about gradient effects. Familiar with grouping and separating objects, duplicating objects, using the Fill and Stroke dialog box and the Align and Distribute dialog box in Inkscape.


How to add depth to a flat image using Inkscape 0.46


Step One:

If you are working with someone else's SVG image, ungroup objects until all paths are separate (ungrouped).Step One
Select all objects and fill bounded areas with a neutral color of your choice. Change the fill to a linear gradient with an opacity to your liking (I used 70%).


Step Two:


Select the background object that provides color only behind all other objects (select no objects -- no paths or shapes) and separate this background object from the rest of the image -- that is, move it to the side. Step Two We will call this the background and we will call the other set the foreground. If this background object does not exist in the image with which you are working, create a shape that you can use to achieve the effect in this step (In the image that I am using for this example, I have a background shape. But if I did not have one, I would create a rectangle because that is the overall shape of the image.).


Step Three:

Step Three

Apply a radial gradient of 70% to the background using the same gradient base that you used to color the foreground. Lower this background object the the lowest level.


Step Four:

Select all of the objects in the foreground (the set from which you removed the background) and duplicate, then group the duplicates.

Step Four


Step Five:

Select the foreground object(s) and select the background and using "Last selected" in the Align and Distribute dialog, align vertically and horizontally.

Step Five

The model that I chose for this tip is available on the Open Clip Art Library. It was taken from a cartoon and colorized by OCAL author johnny_automatic. Inkscape users may import this image from the OCAL using File > Import From Open Clip Art Library and using the search term "father."


If you are importing a raster image into Inkscape, rather than working with an SVG, use the Potrace tool to separate the foreground objects from the background color (use Shift+Alt+B or Path > Trace Bitmap). Spread out the scans, leaving the background alone (separate from the other scans) and group all of the the scans (except the background color) in order to use the technique described in this tip.


Helpful Resources:

The image in this demonstration may be imported into Inkscape from the Open Clip Art Library and is named ocal-0ZZ8UU-johnny_automatic_father_and_daughter_under_tree.svg.
Use File >: Import from The Open Clip Art Library. Use "father" as the search term.

Sunday, May 31, 2009

How to make venetian blinds

Drawing with Inkscape and the Gimp using gradient borders in perspective:


view of a room

The purpose of the demonstration:


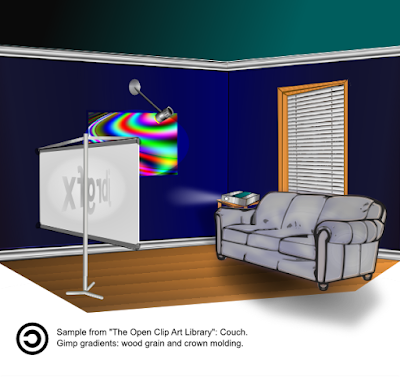
To compare the use of the perspective tools currently available in the Gimp and Inkscape 0.46. I wanted to use linear gradients to outline sections of shapes drawn in perspective. The Gimp comes with some very nice gradients, and one can use them in Inkscape very easily. You simply import a gradient just like an image, and the gradient is then among the available gradients for selection under the Fill and Stroke dialog. My initial approach was to draw my decorative borders in Inkscape after importing Gimp gradients. Then, using the Inkscape perspective tool, I followed my perspective grids and altered the shapes with the borders along their edges. I wanted crown-molding on the walls and the wood-grain around the window-frame and on the floor, for example, and venetian blinds inside the window-frame. Not only was this plan difficult to affect, it did not work very well. I could get the overall shape, a wall for instance, to transform, but that shape's gradient-borders would not transform -- they ended up clipped as they neared the focal point. The Gimp gradient was OK farthest from the image's focal point, but less than full size near the focal point. So, I decided to depend on Gimp's perspective tool to transform each of the shapes with gradient borders and import the result in Inkscape. This technique produced much better results.

In the description below, I took the exercise one step farther. I created the venetian blinds in Inkscape, exported the blinds as a PNG, imported that PNG in the Gimp, transformed the shape using the perspective tool, and imported that for use within my Inkscape drawing.

Tools used to create the venetian blinds:

  • Inkscape 0.46
  • The Gimp 2.4.6


The intended audience and required skills:


Intermediate Inkscape and Gimp users: familiarity with Potrace, use of the Gimp perspective tool, importing Gimp gradients in Inkscape, editing linear gradients, duplicating shapes, and practiced using gradients for shading and lighting effects, drawing Bezier paths, clipping shapes, cloning shapes, and exporting selections to PNG.


How to begin making venetian blinds using Inkscape 0.46 and the Gimp 2.4.6.


Step One:


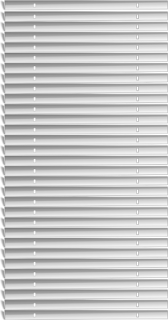
The Gimp gradient entitled "blinds" does not work well as realistic venetian blinds. Since the window in my design was going to end up being one of the key background elements, I wanted the blinds to look more realistic than they did when I used the Gimp "blinds" gradient. I decided to draw my own venetian blinds. I have a few sets of venetian blinds hanging in the room in which I draw, so I eyed them and drafted the following model.


model of a venetian blind

Step Two:


I then chose Edit > Clone > Create Tiled Clones in Inkscape. Using the following settings, I got what I was looking for immediately: Symmetry Tab -- P1: simple translation, and "Rows and Columns" 30 x 1, and Shift Tab -- Shift Y: 1.0% per Row.


Step Three:


Select all paths, group and export.


model venetian blinds

Step Four:


Open the exported PNG in GIMP, use the perspective tool to skew the blinds to achieve the desired shape and save.


venetian blinds in perspective

Step Five:


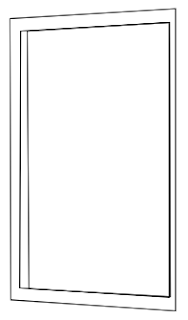
Import the new shape in Inkscape and resize it so that it fits your window frame.


window frame

In the example below, I added two vertical lines to simulate the cords that ones uses to raise and lower a set of venetian blinds.


window frame with venetian blinds

Helpful Resources:


The couch in this demonstration may be imported into Inkscape from the Open Clip Art Library.
Use File >: Import from The Open Clip Art Library. Use "couch" as the search term.

Saturday, May 23, 2009

Creating a shoreline in Inskcape using a photograph as a model

My incomplete project:


sailboat

The purpose of the demonstration:


To show how to use layers and sections of photographs as models for creating landscapes using Inkscape.

Tools used to create the landscape background:

  • Inkscape 0.46


The intended audience and required skills:


Intermediate Inkscape users: familiarity with Potrace, with editing linear gradients, with duplicating shapes, practiced at using gradients for shading and lighting effects, drawing Bezier paths, clipping shapes, and exporting selections to PNG.


How to begin making a landscape background using Inkscape 0.46.


shoreline

Helpful Resources:


The photograph from which this study is derived is by http://www.flickr.com/photos/chefranden/ and may be seen on Flickr.

Wednesday, May 20, 2009

Wood Pencil Study

This study of a pencil is based on "Episode 081 - Create a Pencil Icon," by heathenx, on http://screencasters.heathenx.org/episode-081/, one of the best sources for inspiration for Inkscape artists.


From Drawings

Inkscape and SVG on Wikipedia

Inkscape at Wikipedia


Scalable Vector Graphics at Wikipedia


Saturday, May 16, 2009

Work Progressing

A more complete version of a sailboat.

sailboat

The picture is missing hills in the distance and the people on the boat are unfinished.

The photograph from which this study is derived is by http://www.flickr.com/photos/chefranden/ and may be seen on Flickr.