Showing posts with label tree. Show all posts

Sunday, February 14, 2010

Study in Inksacpe of a Red-Breasted Nuthatch


This study of a a Red-Breasted Nuthatch is largely painted using the brush tool and the tree uses spiro paths with linear gradients to which I applied the filter: texture > bark.

I traced a photo to guide the scale and outline of the major elements. The source photo may be viewed at http://www.flickr.com/photos/randomtruth/2229397564/. The license for the source photo may be reviewed at:

Sunday, February 7, 2010

Torn lines as foreground evergreen trees in Inkscape landscape paintings

evergreen trees using the torn lines filter effect
One last application for the torn lines filter-effect, this time as foreground evergreen trees in Inkscape landscape paintings. Click the illustrations for the basic steps involved in this example of the technique.

Other related posts:

Saturday, February 6, 2010

Torn lines as distant trees in Inscape landscape paintings

One more piece on Inkscape 0.47 techniques . . . in this case, drawing distant trees in a landscape painting, like those used in an earlier post -- that is, mountain painting using inkscape.

Torn lines as distant trees
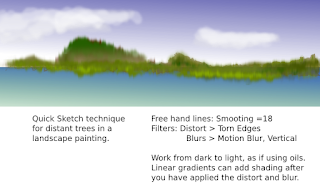
In the painting above, I began drawing a brown line in the shape of a hill. I applied the filter to the line as described in the annotation on the painting. Click on the painting to read about the specific filter settings. I then added a new line with a new shape in a lighter brown. When I began working with greens, I started with the darkest shapes and worked forward using lighter shades. The example below shows one of the original lines, the effect after I applied the torn edges distortion and the effect after I applied the vertcial motion blur.
torn lines examples
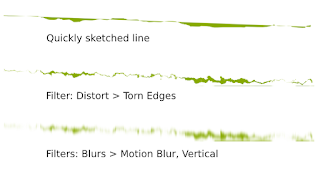
I usually like to use one set of filters with identical settings for an effect in a painting, and simply layer them (one goes directly on top of another), in order to speed the process of painting. If I am simulating watercolor, I will work from light to dark, and if I am simulating oil painting, I will work from dark to light. In this demonstration, I worked from dark to light, while I worked from light to dark in the mountain painting. The technique, however, is identical and very simple. You draw a line, tear the line and blur the torn line. Then I occasionally add a linear gradient for lighting (dark at the top and light near the bottom edge). Finally, I start the whole process again with another quickly-drawn line.

Saturday, October 3, 2009

Light on a Pine Forest Floor

pine forest floor
Experimenting with light . . . the original source for this painting is a photograph by bcostin available on flickr.

I used various Inkscape 0.47 filters on this adaptation of bcostin's great photo. I did sepearate scans of the photo for brightness cutoff, for colors, and for greys, and then deleted all but the basic colors, and then arranged the remaining scans to focus the eye on the light streaming into the trees and onto the forest floor, and, finally, applied several filters to a cropped image in order to blend the contrasts appropriately.

Saturday, May 23, 2009

Creating a shoreline in Inskcape using a photograph as a model

My incomplete project:


sailboat

The purpose of the demonstration:


To show how to use layers and sections of photographs as models for creating landscapes using Inkscape.

Tools used to create the landscape background:

  • Inkscape 0.46


The intended audience and required skills:


Intermediate Inkscape users: familiarity with Potrace, with editing linear gradients, with duplicating shapes, practiced at using gradients for shading and lighting effects, drawing Bezier paths, clipping shapes, and exporting selections to PNG.


How to begin making a landscape background using Inkscape 0.46.


shoreline

Helpful Resources:


The photograph from which this study is derived is by http://www.flickr.com/photos/chefranden/ and may be seen on Flickr.