Sunday, May 31, 2009

How to make venetian blinds

Drawing with Inkscape and the Gimp using gradient borders in perspective:


view of a room

The purpose of the demonstration:


To compare the use of the perspective tools currently available in the Gimp and Inkscape 0.46. I wanted to use linear gradients to outline sections of shapes drawn in perspective. The Gimp comes with some very nice gradients, and one can use them in Inkscape very easily. You simply import a gradient just like an image, and the gradient is then among the available gradients for selection under the Fill and Stroke dialog. My initial approach was to draw my decorative borders in Inkscape after importing Gimp gradients. Then, using the Inkscape perspective tool, I followed my perspective grids and altered the shapes with the borders along their edges. I wanted crown-molding on the walls and the wood-grain around the window-frame and on the floor, for example, and venetian blinds inside the window-frame. Not only was this plan difficult to affect, it did not work very well. I could get the overall shape, a wall for instance, to transform, but that shape's gradient-borders would not transform -- they ended up clipped as they neared the focal point. The Gimp gradient was OK farthest from the image's focal point, but less than full size near the focal point. So, I decided to depend on Gimp's perspective tool to transform each of the shapes with gradient borders and import the result in Inkscape. This technique produced much better results.

In the description below, I took the exercise one step farther. I created the venetian blinds in Inkscape, exported the blinds as a PNG, imported that PNG in the Gimp, transformed the shape using the perspective tool, and imported that for use within my Inkscape drawing.

Tools used to create the venetian blinds:

  • Inkscape 0.46
  • The Gimp 2.4.6


The intended audience and required skills:


Intermediate Inkscape and Gimp users: familiarity with Potrace, use of the Gimp perspective tool, importing Gimp gradients in Inkscape, editing linear gradients, duplicating shapes, and practiced using gradients for shading and lighting effects, drawing Bezier paths, clipping shapes, cloning shapes, and exporting selections to PNG.


How to begin making venetian blinds using Inkscape 0.46 and the Gimp 2.4.6.


Step One:


The Gimp gradient entitled "blinds" does not work well as realistic venetian blinds. Since the window in my design was going to end up being one of the key background elements, I wanted the blinds to look more realistic than they did when I used the Gimp "blinds" gradient. I decided to draw my own venetian blinds. I have a few sets of venetian blinds hanging in the room in which I draw, so I eyed them and drafted the following model.


model of a venetian blind

Step Two:


I then chose Edit > Clone > Create Tiled Clones in Inkscape. Using the following settings, I got what I was looking for immediately: Symmetry Tab -- P1: simple translation, and "Rows and Columns" 30 x 1, and Shift Tab -- Shift Y: 1.0% per Row.


Step Three:


Select all paths, group and export.


model venetian blinds

Step Four:


Open the exported PNG in GIMP, use the perspective tool to skew the blinds to achieve the desired shape and save.


venetian blinds in perspective

Step Five:


Import the new shape in Inkscape and resize it so that it fits your window frame.


window frame

In the example below, I added two vertical lines to simulate the cords that ones uses to raise and lower a set of venetian blinds.
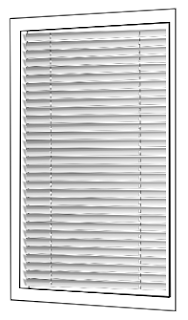

window frame with venetian blinds

Helpful Resources:


The couch in this demonstration may be imported into Inkscape from the Open Clip Art Library.
Use File >: Import from The Open Clip Art Library. Use "couch" as the search term.


Saturday, May 23, 2009

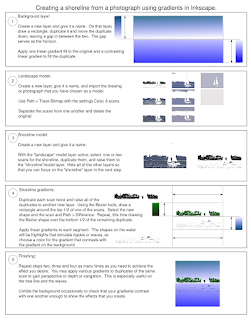
Creating a shoreline in Inskcape using a photograph as a model

My incomplete project:


sailboat

The purpose of the demonstration:


To show how to use layers and sections of photographs as models for creating landscapes using Inkscape.

Tools used to create the landscape background:

  • Inkscape 0.46


The intended audience and required skills:


Intermediate Inkscape users: familiarity with Potrace, with editing linear gradients, with duplicating shapes, practiced at using gradients for shading and lighting effects, drawing Bezier paths, clipping shapes, and exporting selections to PNG.


How to begin making a landscape background using Inkscape 0.46.


shoreline

Helpful Resources:


The photograph from which this study is derived is by http://www.flickr.com/photos/chefranden/ and may be seen on Flickr.

Wednesday, May 20, 2009

Wood Pencil Study

This study of a pencil is based on "Episode 081 - Create a Pencil Icon," by heathenx, on http://screencasters.heathenx.org/episode-081/, one of the best sources for inspiration for Inkscape artists.


From Drawings

Inkscape and SVG on Wikipedia

Inkscape at Wikipedia


Scalable Vector Graphics at Wikipedia


Saturday, May 16, 2009

Work Progressing

A more complete version of a sailboat.

sailboat

The picture is missing hills in the distance and the people on the boat are unfinished.

The photograph from which this study is derived is by http://www.flickr.com/photos/chefranden/ and may be seen on Flickr.

Sunday, May 10, 2009

Work in Progress

Maybe for the next tutorial . . . ?

unfinished sailboat

The photograph from which this study is derived is by http://www.flickr.com/photos/chefranden/ and may be seen on Flickr.

Saturday, May 9, 2009

SVG Flower with leaves in Inkscape

The purpose of the demonstration:


Integrate samples from the Open Clip Art Library into a design of my own to quickly complete a prototype.
flower and leaves

Tools used to create the 3d-text demo:

  • Inkscape 0.46

The intended audience and required skills:


Beginning Inkscape users: familiarity with drawing and smoothing shaped drawn with the Bezier tool, duplicating shapes, practiced at using gradients for shading and lighting effects, and exporting selections to PNG.

How to make this image using Inkscape 0.46.


step-step instructions of the flower tutorial in png format

Uses sample sources for the leaves from:
summer leaves by tom on openclipart DOT org
simple spring, new leaves by tom on openclipart DOT org

Helpful Resources


The Open Clip Art Library

Inkscape users may search for and import clip art from the Open Clip Art Library directly using the Inkscape graphical user interface. Use the following navigation:

File > Import From Open Clip Art Library.


Saturday, May 2, 2009

3d Text in Inkscape

The purpose of the demonstration:

Adapt a great 3d ropes and tubes effect described by Ryan Lerch to logo text.
gfx in 3d text

Tools used to create the 3d-text demo:

  • Inkscape 0.46

The intended audience and required skills:

Beginning Inkscape users: familiarity with converting shapes and text to paths, clipping objects, and exporting selections to PNG.

How to make this image using Inkscape 0.46.

  1. Type your text using a thick, bold-faced font. I used Arial Black (set to bold).
    step one screen-shot

  2. Follow the instructions by Ryan Lerch for creating the 3d rope effect.

  3. Before making your first clone of the text, however, select your text and, using the following navigation in Inkscape, set the object to a path: Path > Object to Path.

  4. The result of steps two and three from Ryan's tutorial should resemble the screen-shot below:
    screen-shot of steps two and three

  5. When I reached step number four in Ryan's tutorial, I substituted a gradient for a color. I flipped and rotated a rectangle that contained my blog's banner gradient, placed it below my 3d-text, and used Object > Clip > Set to fill the text with the gradient.

    screen-shot of step four


I hope that you too can give a slight twist to some of the insightful, online tutorials and achieve original graphics effects of your own.


Helpful Resources


There are lots of Inkscape tutorials related to various methods of affecting 3d text. Try this search to see of the most popular.