Saturday, December 12, 2009

Snow-covered River

snow-covered river

This enter painting was done using one set of filters -- the distort filters, and various size brushes and different brush strokes.

The trees were made with the brush tool, using 50% white fill, 100% grey, blue or green stroke. Once the shape was drawn, I applied the chalk and sponge distort filter effect.

The newly-formed ice is made with a gradient of the same color as the water, just a darker shade, to which I applied the horizontal motion blur distort filter effect.

I used a brush to draw the shadows across the snow and then applied the torn edges distort filter effect.

Sunday, November 29, 2009

Portrait study using various filter-effects

Filter-effects may be applied to one of several layers in an image to achieve widely different results.


Overlay > Garden of Delights

Overlay Garden of Delights


Non Realistic Shaders > ComicNon Realistic Shaders Comic


Image Effects > Oil PaintingImage Effects Oil Painting

Saturday, November 28, 2009

Watercolor painting of a Pyrex bowl and saucer

pyrex bowl and saucer
There are approximately sixteen gradient shapes in this painting of a Pyrex bowl and saucer. I started with a simple drawing comprised of a couple of partially sketched lines as an outline. Then, beginning with the lowest layer and working forward, I drew various shaped-gradients and applied the vertical motion blur filter effect to each of the shapes. This left translucent and transparent areas in the shapes, through which the lower layer peeked.

The light on the rims and the sides of the bowl and saucer, for example, are merely not shaded at all. The clean edges of the gradient shapes at the top of each gradient shape provide the contrast necessary for the eye to "see" the edges of the bowl and and of the saucer although these are not actually drawn -- merely sketched, and not sketched completely.

The vertical motion blur filter effect simulates a wash, as if the brush stroke began clean at the top and ran out of material near the bottom of the effect. The vertical motion blur filter works really well in Inkscape paintings that are meant to simulate water color shades and materials.

SVG source in XML format is available on Google docs.

Watercolor collection

A collection of my experiments to affect a watercolor painting style using the two-dimensional, Inkscape drawing software.

iced coffee
Iced-coffee


forest floor
Light on pine forest floor


gorge
watercolor-style painting of a river gorge


river
A river in the mountains of of the American West

Inkscape filter effect for Web bullets and badges

My favorite Inkscape 0.47 filter effect for Web buttons, bullets and badges is "stained glass."
stained-glass icons


Below are some other examples of filter effects applied to the same shapes, for comparison.


neon-translucent

The background gradient is a gradient blend. The technique for achieving this effect is described elsewhere in this blog. It is not built into Inkscape like the filters used to create these examples.

Saturday, November 14, 2009

Inkscape watercolor violets

More watercolor experiments using Inkscape 0.47 filters and brushes on a rough, quick sketch.

Inkscape watercolor violets

Sunday, November 1, 2009

Watercolor Flower

More filter-effects experiments.
Two brush tools were used in this painting: wiggly and brush.
Different widths and transparencies were set also: wider and more translucent for pastels and thinner darker contrasting colors in the foreground.

I am not happy with the foregorund, so this painting still needs work.

Sunday, October 18, 2009

A wave using spiro splines and jam spread in Inkscape 0.47

wave

This wave was sketched very roughly using the brush tool in Inkscape 0.47 and then I outlined areas using Spiro splines and applied the jam spread filter effect to these shapes.

Monday, October 12, 2009

Study of hills and water inlet

inlet version two

The new version above is improved over the original below. This might be close to finished.


="inlet

The foreground and background still needs work in this study based on a photographic of Akaroa harbour by mollivan_jon on flickr. I have used Inkscape filters new to version 0.47 to paint the light and reflections to my satisfaction.

Akaroa on Wikipedia

If you refer to the original, you will see that I took gross liberties as far as composition of the paitning is concerned, but my intention was to focus on the shapes and the light and shadows on the hills as well as experiment with reflections on the water.

Saturday, October 3, 2009

Light on a Pine Forest Floor

pine forest floor
Experimenting with light . . . the original source for this painting is a photograph by bcostin available on flickr.

I used various Inkscape 0.47 filters on this adaptation of bcostin's great photo. I did sepearate scans of the photo for brightness cutoff, for colors, and for greys, and then deleted all but the basic colors, and then arranged the remaining scans to focus the eye on the light streaming into the trees and onto the forest floor, and, finally, applied several filters to a cropped image in order to blend the contrasts appropriately.

Sunday, August 30, 2009

Translucent Button

side view of a 3d glowing button

Creating translucent and nicely shaded objects with Inkscape 0.47 has become easy with filters.

Tuesday, August 25, 2009

Inkscape 0.47 Filter Effects

icon of a kid

Filter Effects have really improved in Inkscape 0.47.
This icon was composed by drawing a basic 2D shape using Inkscape. I then imported this SVG path into Blender, extruded it to achieve depth and rotated it for perspective, and saved the rendering as a JPEG.
I then imported and scanned the JPEG in Inkscape using potrace, and applied various filter effects to several of the scans. Finally, I positioned the scans on top of the Blender original.

Click on the image to see a larger version. I have saved the scans to which I applied the filter effects separately in the image below so that you can see them more clearly.

icon with effects only

Tuesday, August 4, 2009

Great Blue Heron

I once spent approximately one month living off-the-land on an island in the Atlantic. While I saw few people during my stay, the remote island was a busy place, especially with regard to birds. The gulls owned the wild peas and the Great Blue Herons owned the trees. They would perch as high as they could in order to survey the ocean. I grew to respect their patience and their skill in fishing, but they could have improved on their landing skills. They would soar within reach of the landing, but they just could not control the landing. The noise that they made when crashing into the tree-tops was nerve-wracking.

Anyway, I grew to love their color, their markings, and their grace -- in the air, that is.


Great Blue Heron

I blended two photographs to make this image. I then applied a new, Inkscape 0.47 filter-effect to the landscape only: Filter > Morphology > Warm inside.


Great Blue Heron photo credit:


Landscape photo credit:

Saturday, August 1, 2009

Inkscape 0.46 oil painting filter-effect by jbrgfx

jbrgfx has designed an oil painting filter-effect using Inkscape .046.


red flowers
yellow, red and purple flowers
purple-flowers

The object of this experiment was to preserve depth while highlighting colors. The settings which produced these "paintings" may be seen in detail by clicking the following screen-shot.


oil-paint-filter

Below are instructions for using the filter-effect, at least as I designed it for my own use.


how to use the oil-painting filter-effect

Monday, July 27, 2009

Iced Coffee

iced coffee

Inkscape 0.46 may be used to simulate oil-painting. The new path tools in version 0.47 will make drawing the paths which hold the gradient-fills and gradient-blends faster and more flexible. More paintings like this one are part this blog's short-term plans.


SVG source in XML format is available on Google Docs.

Wednesday, July 22, 2009

Using Gimp filters on a smoke pattern

smoke -highpass effect

The following Gimp features and filters were used to alter the smoke pattern:
Gaussian blur, dodge duplicate layer, invert, desaturate, despeckle, treshold, merge layer down. Various Gimp tutorials entitled this affect "perfect masking using a highpass."
See, for example, http://www.tutorialized.com/view/tutorial/Perfect-masking-using-a-highpass/28768 and http://www.gimp.org/tutorials/Sketch_Effect/

Monday, July 20, 2009

Smoke texture as an Inkscape pattern fill

The JPEG source from which this pattern-fill is constructed is:
http://www.flickr.com/photos/27668445@N03/3191145019/, by lostandtaken.
The photo comes from Caleb Kimbrough who produced a set of "Four Silky Smooth Smoke Textures" and made them available on his textures blog.


smoke pattern-fill

Standing Still

bmw 3d

Thursday, July 16, 2009

Watercolor-style painting of a river gorge

Inkscape and the Gimp were both used to achieve this watercolor-style painting of a river gorge.


watercolor-style painting of a river gorge

Tuesday, July 14, 2009

A river in the mountains of the West

a river in the West

This painting is an attempt to simulate a watercolor style using Inkscape.

The effects are achieved using many small and blended gradients.

Mountain Gorge

The water is still cold in the streams fed with snow-melt, like the one pictured below. The snow is just now diminishing above tree-line in the part of the West where this photo was taken.


Inkscape was used to highlight aspects of tracings of the photo.

mountain gorge

The detailed shot above flows through the gorge pictured in the digital painting below (modeled on one of my photos).


gorge painting

The following inset shows the relative scale of the detail -- this mountain gorge is huge.


gorge-inset

Sunday, June 28, 2009

Pouring a gradient from a can

I enjoy Inkscape's ability to blend colors. It's almost like having gradients in a paint can.

pouring gradients from a paint can

Saturday, June 27, 2009

Arrow made of Bent Metal

This shape was constructed using the perspective effect in Inksacpe 0.46 as well as the following tip posted previously on jbrgfx:


Arrow made of Bent Metal

Monday, June 15, 2009

Animated Spiro

Animation Trick

changing star shape

Each frame of the animation is achieved by changing the base radius and / or the tip radius of the star shape and exporting the image as a PNG. Then the frames are converted into an animated GIF using Imagemagick.

Moving Clouds

moving clouds

Animation of filter-effect


This filter-effect is comprised of the following, in order:

  1. turbulence-fractal noise, applied to the source alpha
  2. color matrix, applied to the source alpha
  3. composite, applied to the source graphic

Saturday, June 13, 2009

Animated Radar Scanner using Inkscape and Imagemagick

I tried several new (to me) Inkscape features and effects in this animation of a radar screen:

  1. render grid
  2. neon object
  3. Animate GIsF

animated radar scanner


The Animate GIF Effect Plugin did not work well at all on my old notebook running Linux. I do not know whether others have had success with this Python add-in to Inkscape. It worked really hard on my project -- to fill up my /tmp DIR with images from which it would build the animation. But, my image layers were much too complex for this tool and I never let it finish. It came close to rendering an animated GIF, but after ten minutes, I killed the process and ran Imagemagick: it worked, as always, and gave me the desired product in . . . (I can't count the low) . . . microseconds..
Here is my convert command:
convert -delay 15 -loop 8 ./*.png animated-radar-scanner.gif


And, here is a sprite of the images that I exported from Inkscape and fed to Imagemagick using the convert command.


sprite of each frame

Sunday, June 7, 2009

Filter Effects as Patterns in Inkscape

The purpose of the demonstration:

Applying linear and radial gradients to irregular shapes in Inkscape often fails to achieve the desired effect. Drawing curved surfaces, for example, using gradients on two-dimensional objects in Inkscape can be difficult and time-consuming.


end product

So can drawing objects in perspctive when those objects have gradient borders. I commented on this issue in an earlier post. I used The Gimp to overcome this apparent limitation to Inkscape gradients and to achieve the effect that I desired. See how to make venetian blinds, drawing with Inkscape and the Gimp using gradient borders in perspective. The purpose of this experiment with Filter and Path Effects is to achieve a curved surface on a two-dimensional shape without using gradients. I have revised the approach to the problem, and have decided to try to design a solution using Inkscape's Filter Effects and apply the product to my shape as a pattern.

Tools used to create a curved shape out of a two-dimensional bezier path using filter effects and patterns:

  • Inkscape 0.46

The intended audience and required skills:


Advanced Inkscape users who are familiar with filter and path effects, converting objects to patterns, and applying patterns as fills to objects in Inkscape 0.46.


How to create a curved shape out of a two-dimensional bezier path using filter effects and patterns in Inkscape 0.46


Step One

Start by drawing a rectangular shape. Select it and open the Filter Effects Dialog box (Object > Filter Effects).


Step Two

Build a Filter Effect that contains the default color-matrix and turbulence, both applied to the Secure Graphic, with settings like those pictured below.


filter effect settings

Once you are satisfied with your texture, convert the texture to a pattern by selecting the rectangle and clicking Alt+i (or Object > Pattern > Objects to Pattern). My pattern is pictured below.


the pattern

Step Three

Now, draw a shape using the Bezier tool.
You may wish to apply a path effect to the shape in order to achieve the desired effect. I bent the path using path effects (shift+control+7).The pattern and the shape are shown in step five, below.


Step Four

Then, apply the pattern to the bezier path as a pattern fill using the Fill and Stroke Dialog box (Shift+Ctrl+F). The pattern and the shape are shown in step five, below.


Step Five

Finally, as pictured below, use the move, rotate and scale handles to manipulate the pattern and achieve the effect that you desire inside of your Bezier path.


apply the pattern to the shape

I wanted a shiny-steel, 3d appearance, so I zoomed in a great deal and moved all but the a few white highlights around until I was pleased with the result.


Helpful Resources

The briefinsights blog has some very useful examples of textures that can be made using color matrix together with turbulence in the Filter Effects dialog in Inkscape.

And, there is always the tutorial by the developer of Filter Effects.

Saturday, June 6, 2009

Add some depth to a flat drawing using Inkscape

The purpose of the demonstration:

Add some depth to the foreground of a flat drawing in a few steps.


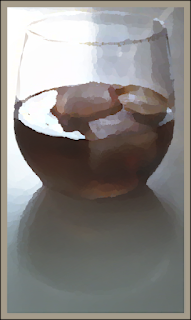
Many clip art images that you may wish to use as samples are drawn well but may not be finished as far as you are concerned. Vector graphics are two dimensional by default, so this is an experiment in seeing where an image could benefit from additional work. In a later post, I describe one technique for creating a rounded surface in a flat object.original model

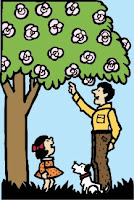
I got the inspiration for using the technique described in this post from an advertisement on television in which all objects of a animated cartoon where different shades of the same color -- the characters, the vehicle, the landscape, and the background. The shades and shapes on the television screen did not change, but their position relative to one-another changed to achieve a very effective animation. I was struck by how easy it would be to colorize shapes using the technique. And, as soon as I tried it in Inkscape, I realized that it was a good trick to use as one tries to apply different colorization schemes to a flat image.


This effect does nothing more than to stripe each separate object in an vector graphic with a gradient. The effect affects the image by simulating rounded edges to shapes. One may use this as an intermediate step in deciding how to colorize a drawing -- that is, in deciding whether objects need to be raised or lowered in relation to other objects and whether gradients of different opacity and different depths of colors will achieve the effect that the author intends.


Tools used to create depth on a flat image:

  • Inkscape 0.46

The intended audience and required skills:


Beginning Inkscape users who wish to learn about gradient effects. Familiar with grouping and separating objects, duplicating objects, using the Fill and Stroke dialog box and the Align and Distribute dialog box in Inkscape.


How to add depth to a flat image using Inkscape 0.46


Step One:

If you are working with someone else's SVG image, ungroup objects until all paths are separate (ungrouped).Step One
Select all objects and fill bounded areas with a neutral color of your choice. Change the fill to a linear gradient with an opacity to your liking (I used 70%).


Step Two:


Select the background object that provides color only behind all other objects (select no objects -- no paths or shapes) and separate this background object from the rest of the image -- that is, move it to the side. Step Two We will call this the background and we will call the other set the foreground. If this background object does not exist in the image with which you are working, create a shape that you can use to achieve the effect in this step (In the image that I am using for this example, I have a background shape. But if I did not have one, I would create a rectangle because that is the overall shape of the image.).


Step Three:

Step Three

Apply a radial gradient of 70% to the background using the same gradient base that you used to color the foreground. Lower this background object the the lowest level.


Step Four:

Select all of the objects in the foreground (the set from which you removed the background) and duplicate, then group the duplicates.

Step Four


Step Five:

Select the foreground object(s) and select the background and using "Last selected" in the Align and Distribute dialog, align vertically and horizontally.

Step Five

The model that I chose for this tip is available on the Open Clip Art Library. It was taken from a cartoon and colorized by OCAL author johnny_automatic. Inkscape users may import this image from the OCAL using File > Import From Open Clip Art Library and using the search term "father."


If you are importing a raster image into Inkscape, rather than working with an SVG, use the Potrace tool to separate the foreground objects from the background color (use Shift+Alt+B or Path > Trace Bitmap). Spread out the scans, leaving the background alone (separate from the other scans) and group all of the the scans (except the background color) in order to use the technique described in this tip.


Helpful Resources:

The image in this demonstration may be imported into Inkscape from the Open Clip Art Library and is named ocal-0ZZ8UU-johnny_automatic_father_and_daughter_under_tree.svg.
Use File >: Import from The Open Clip Art Library. Use "father" as the search term.