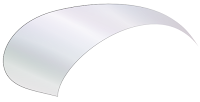
The purpose of the demonstration:
Applying linear and radial gradients to irregular shapes in Inkscape often fails to achieve the desired effect. Drawing curved surfaces, for example, using gradients on two-dimensional objects in Inkscape can be difficult and time-consuming.

So can drawing objects in perspctive when those objects have gradient borders. I commented on this issue in an earlier post. I used The Gimp to overcome this apparent limitation to Inkscape gradients and to achieve the effect that I desired. See how to make venetian blinds, drawing with Inkscape and the Gimp using gradient borders in perspective. The purpose of this experiment with Filter and Path Effects is to achieve a curved surface on a two-dimensional shape without using gradients. I have revised the approach to the problem, and have decided to try to design a solution using Inkscape's Filter Effects and apply the product to my shape as a pattern.
Tools used to create a curved shape out of a two-dimensional bezier path using filter effects and patterns:
- Inkscape 0.46
The intended audience and required skills:
Advanced Inkscape users who are familiar with filter and path effects, converting objects to patterns, and applying patterns as fills to objects in Inkscape 0.46.
How to create a curved shape out of a two-dimensional bezier path using filter effects and patterns in Inkscape 0.46
Step One
Start by drawing a rectangular shape. Select it and open the Filter Effects Dialog box (Object > Filter Effects).
Step Two
Build a Filter Effect that contains the default color-matrix and turbulence, both applied to the Secure Graphic, with settings like those pictured below.

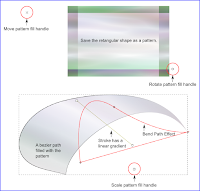
Once you are satisfied with your texture, convert the texture to a pattern by selecting the rectangle and clicking Alt+i (or Object > Pattern > Objects to Pattern). My pattern is pictured below.

Step Three
Now, draw a shape using the Bezier tool.
You may wish to apply a path effect to the shape in order to achieve the desired effect. I bent the path using path effects (shift+control+7).The pattern and the shape are shown in step five, below.
Step Four
Then, apply the pattern to the bezier path as a pattern fill using the Fill and Stroke Dialog box (Shift+Ctrl+F). The pattern and the shape are shown in step five, below.
Step Five
Finally, as pictured below, use the move, rotate and scale handles to manipulate the pattern and achieve the effect that you desire inside of your Bezier path.

I wanted a shiny-steel, 3d appearance, so I zoomed in a great deal and moved all but the a few white highlights around until I was pleased with the result.
Helpful Resources
The briefinsights blog has some very useful examples of textures that can be made using color matrix together with turbulence in the Filter Effects dialog in Inkscape.
And, there is always the tutorial by the developer of Filter Effects.


No comments:
Post a Comment