Sunday, September 26, 2010

Turbulent Water

turbulent water
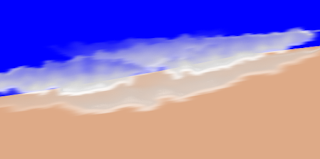
Experimenting with Inkscape's filters to simulate turbulent water.

Sunday, June 20, 2010

Inkscape painting of an English garden

Inkscape painting of an English flower garden
I worked from dark to light using three layers in Inkscape. Pictured above is the finished painting, and below the dark green, red and purple layer on top of the background, with the background alone at the bottom.


green, red and purple layer
tan background with black blur

You may download a partial source document in XML format of layer two from Google Docs.


The photograph upon which I based the painting is hosted on Flickr and distributed under a Creative Commons license.

Saturday, May 1, 2010

Falling water in a mountain stream

rapids in a mountain stream
Pictured above is stage two of the two-stage painting process using Inkscape. You may download a detail of the water layer from Google Docs. A few of the techniques and filters applied on top of the water in step two are not easy to examine until they are separated from the other layers and from the base image created in step one. The SVG download includes a contrasting background to highlight the details. This background is not part of the actual painting.

The sprite below shows step-one. The two-step process involves laying out the shapes, basic contrasting colors and values in the first step and saving that work as an image.


Then, in the second step, painting on top of that imported image goes smoothly and quickly. I have also used the two-step process successfully to paint a sunset by the Pacific Ocean.

The photo upon which this painting is based may be seen on flickr.

The photo is licensed under creative commons.

Sunday, March 28, 2010

Pacific Sunset Step Two

Pacific Sunset Step Two
The painting turned out nicely. The two-step process involves laying out the shapes, basic contrasting colors and values in the first step and saving that work as an image. Then, in the second step, painting on top of that imported image goes smoothly and quickly. Refer the the post of step one to see where I left-off in step one.

You may download the SVG source in xml format of step two of this painting from Google Docs.

I have also used this two-step process successfully to paint falling water in in a mountain stream.

Saturday, March 27, 2010

Pacific Sunset Inkscape Painting

This work in progress represents the first step in a new, two-step process with which I am experimenting using Inkscape 0.47. I have painted the basic areas in this first step. I will paint on top of this base image in the second step.

Inkscape can be quite memory intensive, so once I have nine or ten layers, each composed of gradients and filters, adding strokes or applying effects can take time waiting for the processor on my old PC to finish swapping. Moving parts of one layer to another layer, across too many layers, can be even more memory intensive. So this experiment will involve taking the painting to a point that satisfies me and upon which I can build. I will then export the work as a PNG, just as I have in for this post. This first step took less than one hour to paint. I mostly painted with a thin brush and then clipped the resulting shape from a rectangle so that the color below would show through the shape that I left unshaded in the top layer. Occasionally, I colored the shape and added it alone as a new top layer.

You can see the layers and palette that I used in the first step. The base image is build up in layers which are shown below.
layers step one
The background is on the top at the left while the foreground in in the bottom right. The image is made by stacking and aligning the layers row-by-row, from top to bottom and left to right. The palette also shows the order.

In the second step, I will import that PNG, add layers on top of the flattened image, and finish off fine points with brush strokes and filter effects.

The photo upon which this painting is based was released in the public domain. See the brilliant original entitled Pacific sunset by Andrew Schmidt.

Saturday, February 27, 2010

Inkscape seascape

seascape painting

This study of a wave is based on a photo by photographer Tony Armstrong:
http://www.flickr.com/photos/tonyarmstrong/

The photo is licensed according to:

Tuesday, February 16, 2010

Jenny Lake

Study of Mountain Reflection in Water


Jenny Lake is in the Teton National Park, WY. I chose this scene to study reflections in water because the original photograph contained high contrasts in the values across the water and because it is one of my favorite places. Reflections in dark water are a particular sort of challenge in Inkscape, so I have additional hints about painting high-contrast reflections to add to those that I outlined in the post entitled Painting water using Inkscape 0.47.

Two values of blue, two values of brown, two values of gray, and black were used as very thin brush strokes to compose the water. The browns and grays are all vertical strokes with vertical motion blurs while the blues and black are all horizontal strokes with horizontal motion blurs. The horizontal strokes also have the torn-edge effect while the vertical strokes have the ripple effect. I placed the dark strokes on the bottom and worked toward the light. The edges of each major color of the horizontal strokes would overlap if they were not interwoven -- that is, only the blurred edges overlap where the colors blend because of the transparency of the blurs. The real key is to break the vertical strokes with the horizontal strokes so the eye sees the reflection but it appears to be reflected on top of the rippling surface of the water.

In this study, I have not worked on the mountains (yet); they are tracings from the photo. I hope to work on the mountains at a later date, but for the time being, I have purposefully placed them "out of focus" as they are of less interest to me than the water in this study.

The photograph upon which this painting is based may be seen at: http://www.flickr.com/photos/jacdupree/176301129/. The Creative Commons License is:

Monday, February 15, 2010

Painting water using Inkscape 0.47

This quick sketch demonstrates a technique that I use to paint water in Inkscape, version 0.47. The effect is quite flexible.

the beginnings of a lake

Sunday, February 14, 2010

Study in Inksacpe of a Red-Breasted Nuthatch


This study of a a Red-Breasted Nuthatch is largely painted using the brush tool and the tree uses spiro paths with linear gradients to which I applied the filter: texture > bark.

I traced a photo to guide the scale and outline of the major elements. The source photo may be viewed at http://www.flickr.com/photos/randomtruth/2229397564/. The license for the source photo may be reviewed at:

Sunday, February 7, 2010

Torn lines as foreground evergreen trees in Inkscape landscape paintings

evergreen trees using the torn lines filter effect
One last application for the torn lines filter-effect, this time as foreground evergreen trees in Inkscape landscape paintings. Click the illustrations for the basic steps involved in this example of the technique.

Other related posts:

Saturday, February 6, 2010

torn lines as waves in inkscape

The waves in this illustration demonstrate an another example application of the technique described in the torn lines as distant trees in inkscape post

torn lines as waves in inkscape

Torn lines as distant trees in Inscape landscape paintings

One more piece on Inkscape 0.47 techniques . . . in this case, drawing distant trees in a landscape painting, like those used in an earlier post -- that is, mountain painting using inkscape.

Torn lines as distant trees
In the painting above, I began drawing a brown line in the shape of a hill. I applied the filter to the line as described in the annotation on the painting. Click on the painting to read about the specific filter settings. I then added a new line with a new shape in a lighter brown. When I began working with greens, I started with the darkest shapes and worked forward using lighter shades. The example below shows one of the original lines, the effect after I applied the torn edges distortion and the effect after I applied the vertcial motion blur.
torn lines examples
I usually like to use one set of filters with identical settings for an effect in a painting, and simply layer them (one goes directly on top of another), in order to speed the process of painting. If I am simulating watercolor, I will work from light to dark, and if I am simulating oil painting, I will work from dark to light. In this demonstration, I worked from dark to light, while I worked from light to dark in the mountain painting. The technique, however, is identical and very simple. You draw a line, tear the line and blur the torn line. Then I occasionally add a linear gradient for lighting (dark at the top and light near the bottom edge). Finally, I start the whole process again with another quickly-drawn line.

Sunday, January 31, 2010

Field of Daisies

This painting uses the technique described elsewhere on this blog to draw the pedals of the daisies.

Field of Daisies

The photograph on which this painting is based may be found on: http://www.flickr.com/photos/mrsmagic/477110217/The photo was published under the following creative commons license.

Drawing stems and leaves with Inkscape 0.47

Occasionally, I try to replicate someone else's painting technique using Inkscape. This is a common technique in oil and watercolor painting in which one turns the brush during the stroke in order to go from a thin line to a wider shape. One application of the technique is for drawing leaves quickly, effortlessly and in perspective. I have found that this too can be accomplished in Inkscape using specific settings for the brush tool and some practice. Try a leaf that extends toward you, the painter, and I think that you will agree that the technique works very well. Click the picture for a larger view of the simple instructions.
Stems and Leaves

Monday, January 18, 2010

More experiments with painting rocks

more rock experiments

I have devised another method of simulating rocks using Inkscape 0.47 that is simpler and faster than the method described in the previous post. The illustration to the right contains the required settings. Click on the image to open a larger version.

This method achieves all of those that I identified in the previous post.

Experiments with painting rocks


I left the rocks and cliffs on the mountain painting incomplete. I set down their placement to my satisfaction, but I do not like the contrasts within the rock itself -- that is, the cracked lava filter produced too much sparkle. To the right, I have outlined one technique in its various steps that I plan to try on the painting to achieve several benefits. The benefits that I seek include the ability to draw rocks over larger areas and then to trim them to the actual shapes that I see without having the filter effect change. You will find, as you experiment with Inkscape filters, that moving and resizing an object to which you applied a filter changes the filter's effect. Another benefit that I seek is to use a filter, but to change the contrast of the effect without altering the effect itself. In this case, I wish to lessen the sparkle and but keep the the effects of ridges achieved by using the filter in the first place. Finally, I wish to apply blurs and or gradients to objects which contain filter effects without changing the shape of the effect -- I want to affect only the filter effect's contrast with its surrounding objects. I have complained about ghosting when blurs are applied to filtered objects in another post on this blog (river with newly fallen snow), so I really am using this feature enhancement on one painting to solve a general problem that I have run across in other paintings. Finally, I have used the technique described here before with success with other filters (watercolor-style painting of river), so I wanted to see whether it would work as well on the cracked lava filter. It looks promising. Click on the illustration to see a larger version.

Sunday, January 17, 2010

Mountain painting using Inkscape

mountain painting

Some of the quirks in this work in progress are outlined in the composite of four images below. Each of the four images is on a separate, Inkscape 0.47 layer, and they are listed in the following order: the lowest layer is first in the series and the highest layer is last.

The rocks are only partially drawn in the composite on purpose so that you may see that I drew the shadows first, and then in a new, higher layer, I drew the rocks on top of some of the shadows. I have also drawn one set of rocks on the mountain's main vertical ridge in the composite but I have not applied the filter to it so that this stage of drawing is illustrated. Click on the composite of the four images to see more details, including a few instructions related to some of the brushes and filters used in the painting.

The original photo from which I drew inspiration for this painting may be found at:
http://www.flickr.com/photos/christianabe/2267147039/in/set-72157601230921726/ and its parent site and license at:

Sunday, January 3, 2010

River with Newly Fallen Snow

River with Newly Fallen Snow

This painting was for fun and practice in creating paintings with reflections and in the application of the Inkscape 0.47 Snow Crest Protrusions Filter Effect.

I am quite happy with Inkscape's ability to ripple water and blur gradients in producing paintings with reflections. I learned a lot about how careful one must be with the snow crest filter.

I scanned the photo referenced below in order to "detect edges." This single trace was used over and over to gauge boundaries of shapes, especially the branches. I was able to use the snow crest filter on the bush in the foreground and to duplicate the snow on its branches when compared to the photo by applying the snow crest filter to brush strokes of different widths, lengths and shades that I drew over the outlined shape. This took a great deal of time and patience. If you look closely around the periphery of this foreground bush, you will see that it looks as good as it does because I applied a blur to it, but doing that messed with the snow crest filter so the image ghosts all around the edge. I tried several shortcuts 'cause I am lazy and so much work ended up producing lesser quality than I was after. None of the shortcuts worked very well, so I was never completely satisfied with the snow-crest filter.

The snow crest filter did not work well on shapes that I drew with only a stroke and no fill or shapes on whose fills I had applied a gradient and even worse when I tried to apply the filter to the scanned edges themselves. These paths must be too complex for the filter to work as designed. If you click on the image to see a larger version, you will see many counter-productive, side-effects of having applied the filter too indiscriminately, especially many small specs in one of the copies of the edge scan that ended up looking like stumps and also holes and gaps in the painting that I thought I had filled but that were uncovered after the filter was applied with a blur.

I will use the filter more carefully and selectively the next time that I use it in painting with Inkscape.

Photo source upon which this painting is based: http://www.flickr.com/photos/piper/2176247846/. The author ascribed the following rights via a Create Commons license: