Showing posts with label gradient. Show all posts

Monday, July 27, 2009

Iced Coffee

iced coffee

Inkscape 0.46 may be used to simulate oil-painting. The new path tools in version 0.47 will make drawing the paths which hold the gradient-fills and gradient-blends faster and more flexible. More paintings like this one are part this blog's short-term plans.


SVG source in XML format is available on Google Docs.

Thursday, July 16, 2009

Watercolor-style painting of a river gorge

Inkscape and the Gimp were both used to achieve this watercolor-style painting of a river gorge.


watercolor-style painting of a river gorge

Tuesday, July 14, 2009

A river in the mountains of the West

a river in the West

This painting is an attempt to simulate a watercolor style using Inkscape.

The effects are achieved using many small and blended gradients.

Sunday, June 28, 2009

Pouring a gradient from a can

I enjoy Inkscape's ability to blend colors. It's almost like having gradients in a paint can.

pouring gradients from a paint can

Saturday, June 27, 2009

Arrow made of Bent Metal

This shape was constructed using the perspective effect in Inksacpe 0.46 as well as the following tip posted previously on jbrgfx:


Arrow made of Bent Metal

Saturday, June 6, 2009

Add some depth to a flat drawing using Inkscape

The purpose of the demonstration:

Add some depth to the foreground of a flat drawing in a few steps.


Many clip art images that you may wish to use as samples are drawn well but may not be finished as far as you are concerned. Vector graphics are two dimensional by default, so this is an experiment in seeing where an image could benefit from additional work. In a later post, I describe one technique for creating a rounded surface in a flat object.original model
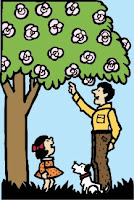
I got the inspiration for using the technique described in this post from an advertisement on television in which all objects of a animated cartoon where different shades of the same color -- the characters, the vehicle, the landscape, and the background. The shades and shapes on the television screen did not change, but their position relative to one-another changed to achieve a very effective animation. I was struck by how easy it would be to colorize shapes using the technique. And, as soon as I tried it in Inkscape, I realized that it was a good trick to use as one tries to apply different colorization schemes to a flat image.


This effect does nothing more than to stripe each separate object in an vector graphic with a gradient. The effect affects the image by simulating rounded edges to shapes. One may use this as an intermediate step in deciding how to colorize a drawing -- that is, in deciding whether objects need to be raised or lowered in relation to other objects and whether gradients of different opacity and different depths of colors will achieve the effect that the author intends.


Tools used to create depth on a flat image:

  • Inkscape 0.46

The intended audience and required skills:


Beginning Inkscape users who wish to learn about gradient effects. Familiar with grouping and separating objects, duplicating objects, using the Fill and Stroke dialog box and the Align and Distribute dialog box in Inkscape.


How to add depth to a flat image using Inkscape 0.46


Step One:

If you are working with someone else's SVG image, ungroup objects until all paths are separate (ungrouped).Step One

Select all objects and fill bounded areas with a neutral color of your choice. Change the fill to a linear gradient with an opacity to your liking (I used 70%).


Step Two:


Select the background object that provides color only behind all other objects (select no objects -- no paths or shapes) and separate this background object from the rest of the image -- that is, move it to the side. Step Two We will call this the background and we will call the other set the foreground. If this background object does not exist in the image with which you are working, create a shape that you can use to achieve the effect in this step (In the image that I am using for this example, I have a background shape. But if I did not have one, I would create a rectangle because that is the overall shape of the image.).


Step Three:

Step Three

Apply a radial gradient of 70% to the background using the same gradient base that you used to color the foreground. Lower this background object the the lowest level.


Step Four:

Select all of the objects in the foreground (the set from which you removed the background) and duplicate, then group the duplicates.

Step Four


Step Five:

Select the foreground object(s) and select the background and using "Last selected" in the Align and Distribute dialog, align vertically and horizontally.

Step Five

The model that I chose for this tip is available on the Open Clip Art Library. It was taken from a cartoon and colorized by OCAL author johnny_automatic. Inkscape users may import this image from the OCAL using File > Import From Open Clip Art Library and using the search term "father."


If you are importing a raster image into Inkscape, rather than working with an SVG, use the Potrace tool to separate the foreground objects from the background color (use Shift+Alt+B or Path > Trace Bitmap). Spread out the scans, leaving the background alone (separate from the other scans) and group all of the the scans (except the background color) in order to use the technique described in this tip.


Helpful Resources:

The image in this demonstration may be imported into Inkscape from the Open Clip Art Library and is named ocal-0ZZ8UU-johnny_automatic_father_and_daughter_under_tree.svg.
Use File >: Import from The Open Clip Art Library. Use "father" as the search term.

Saturday, May 16, 2009

Work Progressing

A more complete version of a sailboat.

sailboat

The picture is missing hills in the distance and the people on the boat are unfinished.

The photograph from which this study is derived is by http://www.flickr.com/photos/chefranden/ and may be seen on Flickr.

Sunday, May 10, 2009

Work in Progress

Maybe for the next tutorial . . . ?

unfinished sailboat

The photograph from which this study is derived is by http://www.flickr.com/photos/chefranden/ and may be seen on Flickr.

Saturday, May 2, 2009

3d Text in Inkscape

The purpose of the demonstration:

Adapt a great 3d ropes and tubes effect described by Ryan Lerch to logo text.
gfx in 3d text

Tools used to create the 3d-text demo:

  • Inkscape 0.46

The intended audience and required skills:

Beginning Inkscape users: familiarity with converting shapes and text to paths, clipping objects, and exporting selections to PNG.

How to make this image using Inkscape 0.46.

  1. Type your text using a thick, bold-faced font. I used Arial Black (set to bold).
    step one screen-shot

  2. Follow the instructions by Ryan Lerch for creating the 3d rope effect.

  3. Before making your first clone of the text, however, select your text and, using the following navigation in Inkscape, set the object to a path: Path > Object to Path.

  4. The result of steps two and three from Ryan's tutorial should resemble the screen-shot below:
    screen-shot of steps two and three

  5. When I reached step number four in Ryan's tutorial, I substituted a gradient for a color. I flipped and rotated a rectangle that contained my blog's banner gradient, placed it below my 3d-text, and used Object > Clip > Set to fill the text with the gradient.

    screen-shot of step four


I hope that you too can give a slight twist to some of the insightful, online tutorials and achieve original graphics effects of your own.


Helpful Resources


There are lots of Inkscape tutorials related to various methods of affecting 3d text. Try this search to see of the most popular.

Monday, April 27, 2009

3D Gradient Banner in SVG

The purpose of the demonstration:

Gradients are Inkscape's strong-suit. This demo shows how to creatively combine gradients to affect a raised shape. The technique can be applied to buttons, picture frames, raised portions of other shapes, or clipped and used to simulate perspective.

Tools used to create the demo:

Inkscape 0.46

The intended audience and required skills:

Intermediate users of Inkscape (none of the basic steps in achieving the end result are explained nor are they illustrated).

3d gradient bannerThe banner pictured on the left is an example of an Inkscape gradient blend filter effect and gradient 3d effect. Click the image to view a larger resolution.

These effects are very easy to achieve using Scalable Vector Graphics in a tool like Inkscape.

How to make this image using Inkscape 0.46.

  1. draw two gradients (I made two linear gradients of my own), apply each gradient to a separate shape (I used identical rectangles) and select both shapes.

  2. open Objects > Filter-effects;

  3. configure and apply a blend > multiply filter.

  4. export the blended gradient as a png.

  5. draw a shape (I used a rectangle) and convert it to a path.

  6. open Effects > Modify Path > Edge 3d (apply the effect using the default settings).

  7. import the png (saved via export in step number three above) and resize the png to the 3d shape (I used a rectangle).

  8. lower the png so that the 3d effect is on top.

  9. group and export the shape (I used a rectangle) as a png.


filter effectsThe filter effects are going to be even easier to use in Inkscape 0.47. You will be able to select pre-built filters as well as constructing your own in this next version of Inkscape, which is due for release on June 15, 2009.

Note that the same effect used here to achieve the blend can be achieved using the blend tool on the layers tab just as well (refer to Niko Kiirala on blend filter effects). The reason for using the filters-effects method in this tip is to get you interested in making your own filters. The filter-effects UI, new to version 0.46 and expanded and enhanced in version 0.47 of Inkscape, is easy to use and very flexible. And it is the best way to mix multiple effects (which cannot be done using the layers UI in Inkscape without separating your gradient shapes onto sepearate layers).

Helpful Resources: