The purpose of the demonstration:
Add some depth to the foreground of a flat drawing in a few steps.
Many clip art images that you may wish to use as samples are drawn well but may not be finished as far as you are concerned. Vector graphics are two dimensional by default, so this is an experiment in seeing where an image could benefit from additional work. In a later post, I describe one technique for creating a rounded surface in a flat object.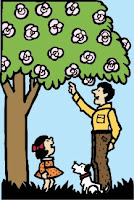
I got the inspiration for using the technique described in this post from an advertisement on television in which all objects of a animated cartoon where different shades of the same color -- the characters, the vehicle, the landscape, and the background. The shades and shapes on the television screen did not change, but their position relative to one-another changed to achieve a very effective animation. I was struck by how easy it would be to colorize shapes using the technique. And, as soon as I tried it in Inkscape, I realized that it was a good trick to use as one tries to apply different colorization schemes to a flat image.
This effect does nothing more than to stripe each separate object in an vector graphic with a gradient. The effect affects the image by simulating rounded edges to shapes. One may use this as an intermediate step in deciding how to colorize a drawing -- that is, in deciding whether objects need to be raised or lowered in relation to other objects and whether gradients of different opacity and different depths of colors will achieve the effect that the author intends.
Tools used to create depth on a flat image:
- Inkscape 0.46
The intended audience and required skills:
Beginning Inkscape users who wish to learn about gradient effects. Familiar with grouping and separating objects, duplicating objects, using the Fill and Stroke dialog box and the Align and Distribute dialog box in Inkscape.
How to add depth to a flat image using Inkscape 0.46
Step One:
If you are working with someone else's SVG image, ungroup objects until all paths are separate (ungrouped).
Select all objects and fill bounded areas with a neutral color of your choice. Change the fill to a linear gradient with an opacity to your liking (I used 70%).
Step Two:
Select the background object that provides color only behind all other objects (select no objects -- no paths or shapes) and separate this background object from the rest of the image -- that is, move it to the side.  We will call this the background and we will call the other set the foreground. If this background object does not exist in the image with which you are working, create a shape that you can use to achieve the effect in this step (In the image that I am using for this example, I have a background shape. But if I did not have one, I would create a rectangle because that is the overall shape of the image.).
Step Three:
Apply a radial gradient of 70% to the background using the same gradient base that you used to color the foreground. Lower this background object the the lowest level.
Step Four:
Select all of the objects in the foreground (the set from which you removed the background) and duplicate, then group the duplicates.
Step Five:
Select the foreground object(s) and select the background and using "Last selected" in the Align and Distribute dialog, align vertically and horizontally.

The model that I chose for this tip is available on the Open Clip Art Library. It was taken from a cartoon and colorized by OCAL author johnny_automatic. Inkscape users may import this image from the OCAL using File > Import From Open Clip Art Library and using the search term "father."
If you are importing a raster image into Inkscape, rather than working with an SVG, use the Potrace tool to separate the foreground objects from the background color (use Shift+Alt+B or Path > Trace Bitmap). Spread out the scans, leaving the background alone (separate from the other scans) and group all of the the scans (except the background color) in order to use the technique described in this tip.
Helpful Resources:
The image in this demonstration may be imported into Inkscape from the Open Clip Art Library and is named ocal-0ZZ8UU-johnny_automatic_father_and_daughter_under_tree.svg.
Use File >: Import from The Open Clip Art Library. Use "father" as the search term.





No comments:
Post a Comment