Sunday, June 20, 2010

Inkscape painting of an English garden

Inkscape painting of an English flower garden
I worked from dark to light using three layers in Inkscape. Pictured above is the finished painting, and below the dark green, red and purple layer on top of the background, with the background alone at the bottom.


green, red and purple layer
tan background with black blur

You may download a partial source document in XML format of layer two from Google Docs.


The photograph upon which I based the painting is hosted on Flickr and distributed under a Creative Commons license.

Saturday, May 1, 2010

Falling water in a mountain stream

rapids in a mountain stream
Pictured above is stage two of the two-stage painting process using Inkscape. You may download a detail of the water layer from Google Docs. A few of the techniques and filters applied on top of the water in step two are not easy to examine until they are separated from the other layers and from the base image created in step one. The SVG download includes a contrasting background to highlight the details. This background is not part of the actual painting.

The sprite below shows step-one. The two-step process involves laying out the shapes, basic contrasting colors and values in the first step and saving that work as an image.


Then, in the second step, painting on top of that imported image goes smoothly and quickly. I have also used the two-step process successfully to paint a sunset by the Pacific Ocean.

The photo upon which this painting is based may be seen on flickr.

The photo is licensed under creative commons.

Sunday, March 28, 2010

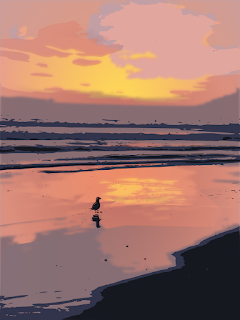
Pacific Sunset Step Two

Pacific Sunset Step Two
The painting turned out nicely. The two-step process involves laying out the shapes, basic contrasting colors and values in the first step and saving that work as an image. Then, in the second step, painting on top of that imported image goes smoothly and quickly. Refer the the post of step one to see where I left-off in step one.

You may download the SVG source in xml format of step two of this painting from Google Docs.

I have also used this two-step process successfully to paint falling water in in a mountain stream.

Saturday, March 27, 2010

Pacific Sunset Inkscape Painting

This work in progress represents the first step in a new, two-step process with which I am experimenting using Inkscape 0.47. I have painted the basic areas in this first step. I will paint on top of this base image in the second step.

Inkscape can be quite memory intensive, so once I have nine or ten layers, each composed of gradients and filters, adding strokes or applying effects can take time waiting for the processor on my old PC to finish swapping. Moving parts of one layer to another layer, across too many layers, can be even more memory intensive. So this experiment will involve taking the painting to a point that satisfies me and upon which I can build. I will then export the work as a PNG, just as I have in for this post. This first step took less than one hour to paint. I mostly painted with a thin brush and then clipped the resulting shape from a rectangle so that the color below would show through the shape that I left unshaded in the top layer. Occasionally, I colored the shape and added it alone as a new top layer.

You can see the layers and palette that I used in the first step. The base image is build up in layers which are shown below.
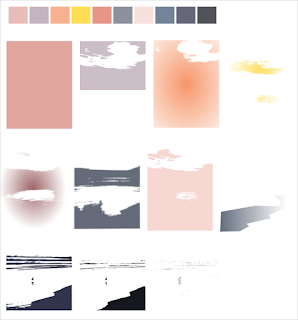
layers step one
The background is on the top at the left while the foreground in in the bottom right. The image is made by stacking and aligning the layers row-by-row, from top to bottom and left to right. The palette also shows the order.

In the second step, I will import that PNG, add layers on top of the flattened image, and finish off fine points with brush strokes and filter effects.

The photo upon which this painting is based was released in the public domain. See the brilliant original entitled Pacific sunset by Andrew Schmidt.